https://www.jclarkemarine.com/blogs/news.atomJ Clarke Marine - Blogs2022-10-21T15:48:33+01:00J Clarke Marinehttps://www.jclarkemarine.com/blogs/news/marine-grade-stainless-steel-stockist-in-the-uk2022-10-21T15:48:33+01:002022-10-21T15:48:34+01:00Marine grade stainless steel stockist in the UKJohn ClarkeSo why J Clarke Marine?
We established in 2011 from a spare room and rapidly grew to become one the UK's most competitive and reputable supplier of boat canopy fasteners, stainless steel fittings, including eye bolts, shackles, carabiners, turnbuckles, tube fittings and wire ropes accessories.
Quickly we realised that our initial targeted market being boating and sailing soon expanding to all marine sectors, garden, DIY, construction, engineering, fabrication, landscaping, pet supplies and more.
We have been sourcing stainless steel products for over 10 years now and quickly built up a relationship with one key manufacturer. The quality of their 316 A4 Stainless steel is next to none.
Not only do we sell marine grade stainless steel products to the end user but we have a growing business customer list and can supply in bulk to the trade and other companies.
We offer free delivery anywhere in the UK and usually post everything out the same day before out 4pm collection.
The feedback on marketplaces we sell on and our website is greatly appreciated and it's lovely to here such positivity about our business. As we are just a husband and wife team we do take all feedback on board and always here to listen to the customers , place orders one on one or simply advise the customer about their query.
We may just be a small family business but we strive to continue to be one of the UK's leading distributors for stainless steel products particularly in 316 A4 marine grade.
Regards
John and Laura
]]>
https://www.jclarkemarine.com/blogs/news/ykk-snad-self-adhesive-snap-fasteners-with-3m-tape2019-02-21T14:00:00+00:002021-06-18T12:15:24+01:00YKK Snad self adhesive snap fasteners with 3m tapeJohn Clarke
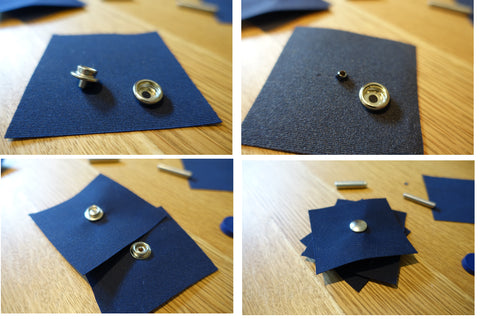
YKK Snad fasteners are a relatively new fastener to the market. Made by YKK they have been trailed and tested under various conditions. There was a gap in the market for a self adhesive snap fastener and SNAD fits the bill. People will say it looks good, ticks all the boxes but are they strong enough.... well flip me they are strong. If you stick by the rules then they should last a very long time.
Unlike traditional metal trims, SNAD® is a plastic adhesive snap component. This product will not snag clothing or deteriorate from exposure to sunlight, sand, or dirt. Plus, walking on SNAD® is pain free due to its unique dome shape. Installation is simple, clean the surface where the snap is to be applied, peel off the protective paper backing, position and firmly hold the snap in place and release. No tools, no waiting, no splits, no holes!
"SNAD® " is a registered trademark of YKK CORPORATION in Japan and other countries/regions.
All sounds too good to be true... well its true.
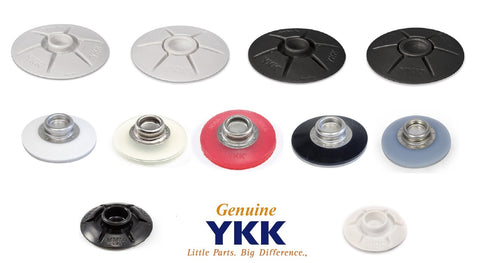
Here is the range we offer
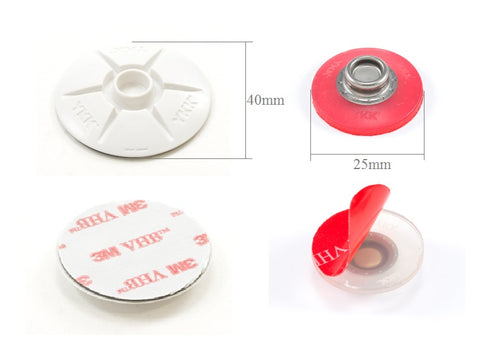
Snads come in 25 and 40mm diameters. Both in cap and socket forms. The bases are either black or white plastic and clear, white or grey flexi bases. The plastic bases are suited to flat surfaces. Must be completely flat with no ridges, bevels or bumps. The clear flexi bases are good for curved smooth surfaces.
Snap components will adhere to most clean, dry and well-unified surfaces. Typical surface cleaning solvents are a 50/50 Isopropyl Alcohol (rubbing alcohol) water mixture. After application, the bond strength increases and approaches the ultimate bond strength after 72 hours at 70°F (21°C). Typical bond strength build-up: 20 minutes equals 50% bond strength, one hour equals 75% bond strength, one day equals 90% bond strength, and three days equals 100% bond strength.
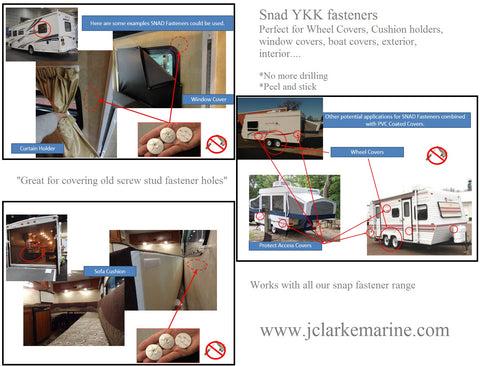
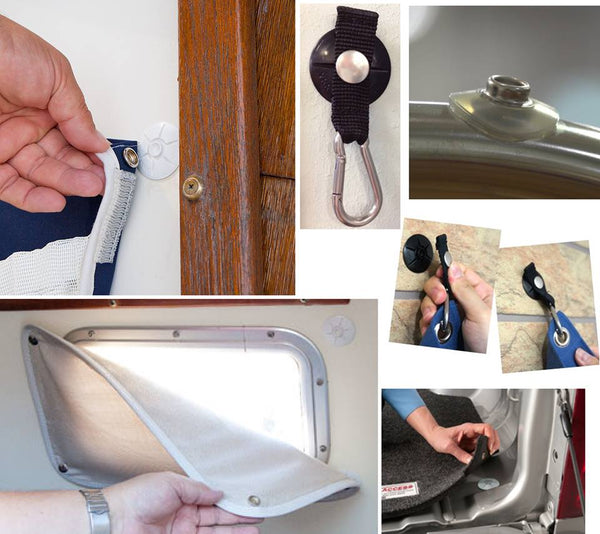
Snad fasteners are perfect to use on caravan and motorhome especially for wheel arch covers. No need to drill into the side of your caravan with these. Plus you would hardly notice they are there.
There are also tonnes of other uses for YKK snad self adhesive fasteners. Curtains, carpets, boat canopies......etc
All the YKK Snad fasteners work with all our snap fasteners. We also have tools to fit the snap fasteners which can be found in our shop here All you need to do is choose whether you want the brass nickel plated range, 304 stainless steel range or 316 stainless steel range.
]]>
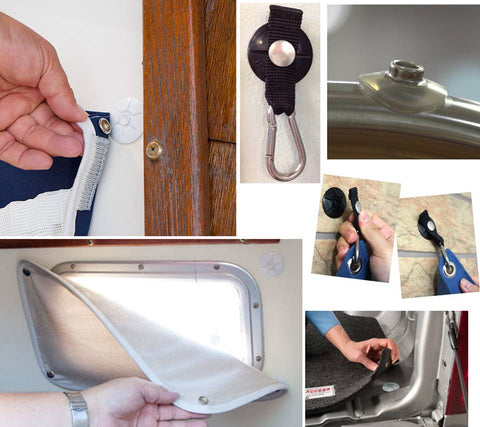
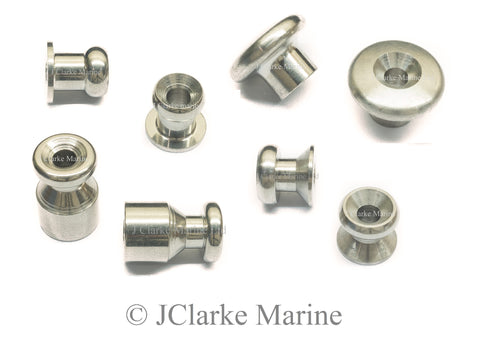
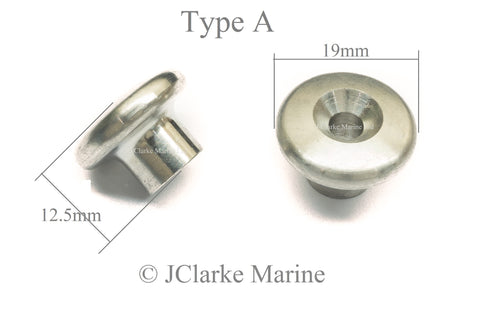
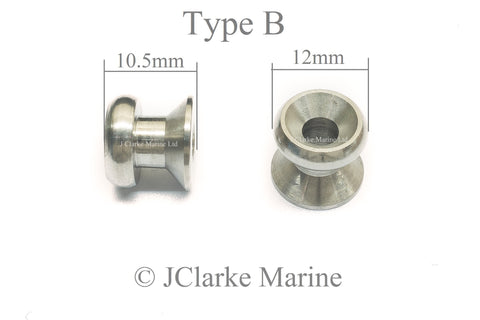
https://www.jclarkemarine.com/blogs/news/stainless-steel-lacing-buttons-and-mushrooms2017-04-26T11:13:00+01:002021-03-24T09:19:56+00:00Stainless steel lacing buttons and mushroomsJohn Clarke
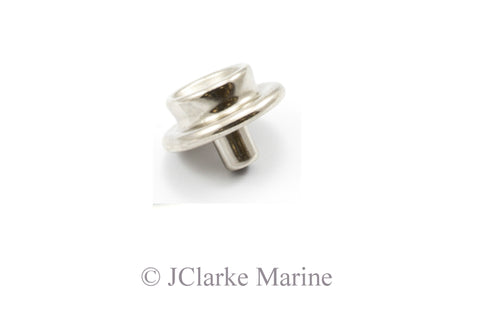
New in stock , we have a lovely range of Stainless steel lacing buttons made from marine grade 316 A4 stainless steel. We have a number of different styles to suit all canopy and sprayhood needs. The main usage for these lacing buttons are to hold down shockcord and bungee cord to keep the bimini or boat canopy nice and tight but yet with the use of bungee cord there will be a little room for movement when the wind picks up which will help the canopy prolong its life rather than being fixed to the deck with a fastener.
]]>
https://www.jclarkemarine.com/blogs/news/what-are-tenax-fasteners-and-how-to-fit-tenax-fasteners2016-09-28T13:00:00+01:002017-10-26T21:16:26+01:00What are Tenax fasteners and how to fit Tenax fastenersJohn Clarke
Tenax fasteners have been established for well over 70 years now. Originally used on military vehicles and garments they can now be found on fire and rescue equipment, caravans, luxury boats and more commonly the classic car market (Morgan, Triumphs, Mg Midgets, Ac Cobra, Austin Healey to name a few. With a full patent Tenax snap locking fasteners have enjoyed a world wide reputation wherever a compact and secure fitting when a quick release facility is required. The fastener is self locking and remain engaged to its peg until the release is required which is achieved simply by a pinch of the button top. A variety of different fittings and pegs with various thread lengths means that a wide range material thicknesses can be accommodated. Now I will briefly introduce you to each of the fasteners we currently stock.
Above you will see the range we offer.
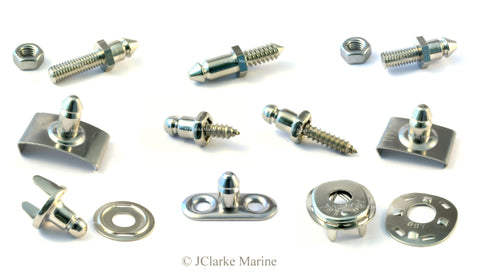
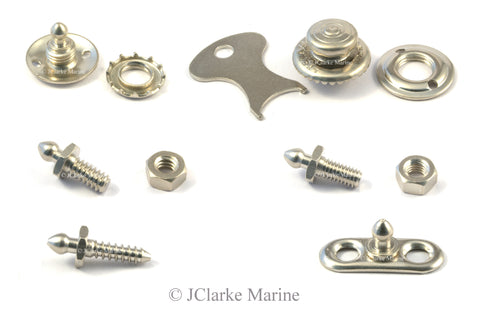
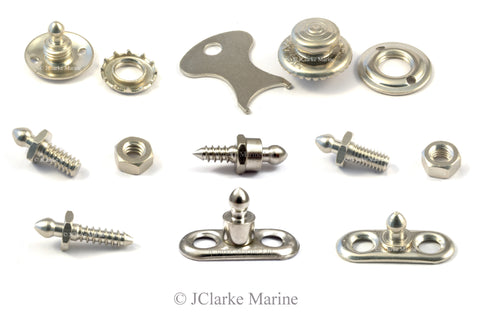
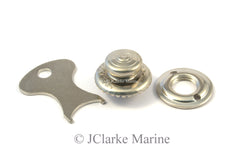
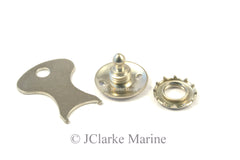
The Tenax button and locking nut
The button and locking nut are the two parts that attach to your canvas. Very simple to fit as only a single circular hole is required then you tighten the nut against the fabric with a key provided. They can come is 4 different designs. Knurled knobs and broad knobs. The knurled knob in the picture is the most common.
The Tenax canvas peg
The only other tenax fastener to attach to the fabric. Using the canvas peg and the button and nut will allow you to attach canvas to canvas. Like the button and nut its very simple to attach. The canvas pegs come in various lengths to allow for thicker canvas to be used. In the picture is the shortest of the range.
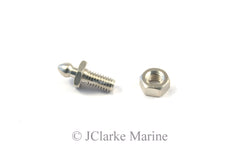
Tenax threaded studs
Tenax have three sizes of threaded studs in their range. The 2ba thread, the whiteworth 3/16" and the 3/32" special peg. They can either be bought as in the picture (standard stud) or can have a shouldered stud where the tip is slightly raised. Below I have added a picture of a shouldered 2 hole base stud where you can see the difference.
Tenax 2 hole base stud
Depending on your application Tenax also can offer the two hole base stud. This means you can fix the stud to a car, boat deck or caravan by using whatever you want to pass through the holes. You could rivet, screws, tap, etc....These also come in both shouldered and standard version.
Tenax woodscrew stud
Last but not least the simplest and most common way to attach the tenax stud to your project. Simply drill a small pivot hole and screw in this stud. Again it can be bought shouldered or standard.
Tenax may be a more expensive option when coming to fasten your canopy down but they are completely rust proof, over 70 years or proven usage and in their own words.... The original and still the best.
]]>
https://www.jclarkemarine.com/blogs/news/117031365-how-to-fit-turnbutton-fasteners2016-05-05T14:06:00+01:002021-09-13T08:49:57+01:00How to fit turnbutton fastenersJohn Clarke
After reading section 1 of my Turnbuttons guide you will have seen all the different fasteners and know about their different functions.
Here I am going to explain how to fit the turnbutton eyelet and washer, then the turnbutton 2 prong stud and washer.
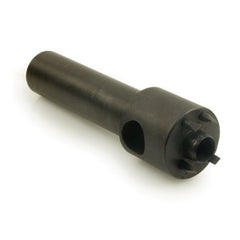
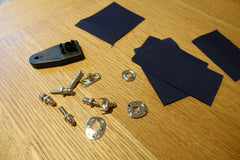
Tools, required for the job. Turnbutton hole cutter, hammer and wooden base. (preferably not your dining table)
So taking our turnbutton eyelet and washer first, position your canvas over the turnbutton base and mark where you want the eyelet to be fixed. Normally you would have all your bases fitted to your boat first and work from the centre of your cover out start marking the eyelet positions. Fit each eyelet fully then mark the next so you have no creases in the material. Once marked then position the tool where you require and simply strike several times with a hammer. Preferably not on your new oak table. Photo is just for illustration purposes. I went outside and used a soft wood base.
Then insert the turnbutton eyelet through the holes and through the plate on the other side. Bend each prong down against the washer until it is firmly fixed
You can now fit the eyelet and washer to any of the studs. Make sure you get the turnbutton the correct way around , as you can see from this picture the base can only be locked in one position.
Now for the 2 prong stud. Position the stud on the canvas and hold it down firmly to make an indent on your cover.
Then with a sharp knife, simply cut the two indents about 3-4mm wide.
Then insert the 2 prong stud through the canvas and also through the washer on the other side. Again bend down the prongs against the washer to secure the fastener.
You can now fit the eyelet and washer to the 2 prong stud and washer.
]]>
https://www.jclarkemarine.com/blogs/news/116462277-what-are-turnbuttons2016-04-26T10:46:00+01:002021-09-13T08:49:23+01:00What are turnbuttons and how to fit turnbutton fastenersJohn Clarke
Also known as Common Sense fasteners outside Europe, again another fastener that was first invented to hold curtains back on horse driving carriages, but once the first group of automobiles came along the turnbutton was used in open air cars to secure curtains. Turnbuttons are probably the most common fasteners used on boat canopies as they can not be opened by accident. They require force to twist the button on the stud which allows the release of the socket. The prongs on the socket come in two lengths to accommodate different thickness of material. There are many types of studs also, again to entertain the thickness of material or the material they are being fixed too.
So lets look at and explain each turnbutton in more detail
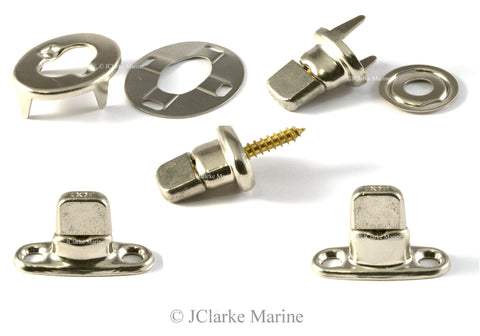
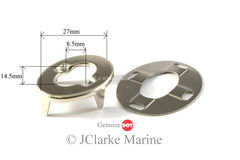
Turnbutton fastener eyelet and plate. These parts are fastened to the canvas and can be connected to any of the other turnbuttons shown in the picture above.
6mm Turnbutton 2 hole base. I would say this is the most common 2 hole base stud. To be honest, I get phones calls daily with people asking which to go for. What is the different between 6mm and 8mm turnbuttons?? When I explain where the 6mm and 8mm comes from it then all makes sense.
8mm Turnbutton 2 hole base So now we can see where the 6mm and 8mm relates to. If you have a thicker canvas you would use the 8mm stud.
Screw in brass threaded turnbutton stud Probably the least used turnbutton of them all as the two bases above do the same job for half the price and are better secured. But if you only have room for one screw hole then this fits the bill perfectly.
Turnbutton cloth to cloth When you are needing to attach two pieces of canvas together with turnbutton then this is the only way.
We have designed this turnbutton tool ourselves. Perfect for doing one off jobs and also very cost effective. Very very functional and helps fit the eyelets no problem
The turnbutton hole punch tool This tool will cut an oval hole and four slits for the turnbutton eyelet to be easily fitted to your canvas. Simply by striking a hammer against its end.
After reading section 1 of my Turnbuttons guide you will have seen all the different fasteners and know about their different functions.
Here I am going to explain how to fit the turnbutton eyelet and washer, then the turnbutton 2 prong stud and washer.
Tools, required for the job. Turnbutton hole cutter, hammer and wooden base. (preferably not your dining table)
So taking our turnbutton eyelet and washer first, position your canvas over the turnbutton base and mark where you want the eyelet to be fixed. Normally you would have all your bases fitted to your boat first and work from the centre of your cover out start marking the eyelet positions. Fit each eyelet fully then mark the next so you have no creases in the material. Once marked then position the tool where you require and simply strike several times with a hammer. Preferably not on your new oak table. Photo is just for illustration purposes. I went outside and used a soft wood base.
Then insert the turnbutton eyelet through the holes and through the plate on the other side. Bend each prong down against the washer until it is firmly fixed
You can now fit the eyelet and washer to any of the studs. Make sure you get the turnbutton the correct way around , as you can see from this picture the base can only be locked in one position.
Now for the 2 prong stud. Position the stud on the canvas and hold it down firmly to make an indent on your cover.
Then with a sharp knife, simply cut the two indents about 3-4mm wide.
Then insert the 2 prong stud through the canvas and also through the washer on the other side. Again bend down the prongs against the washer to secure the fastener.
You can now fit the eyelet and washer to the 2 prong stud and washer.
]]>
https://www.jclarkemarine.com/blogs/news/116334725-what-are-snap-fasteners2016-04-22T10:37:00+01:002021-05-27T13:51:18+01:00How to fit snap fasteners and the different typesJohn ClarkeSnap fasteners are used all over the world in a multitude of industries, but we are going to talk about the boating end of the market where the Durable DOT brand is a world leader. With the right tools the durable DOT snap fastener is self piercing and can penetrate through tough materials without the need of a hole pre cut. They have consistent snap action time after time.
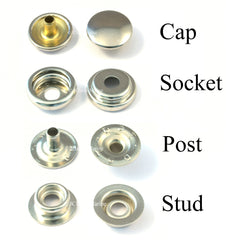
There are many different types of snap fasteners so below I will briefly try and describe each one.
First up we have the snap fastener cap. The cap comes in various lengths. When I say lengths, I talk about the cylindrical post length that protrudes from the centre of the cap. We tend to stock a 4mm long and a 6mm long. This should cover 99% of material thickness. If you have a few layers of material then you would want to use the 6mm. Other wise use the 4mm
The cap would not be complete with out the socket. These two are crimped together to create a snap. The cap being on the outside of the canvas and the socket on the inside. Special tools are require to secure the cap to the socket.
The snap fastener stud. This particular stud has two main uses. 1. It can be attached to the deck with a screw or nut and threaded screw which can be then connected straight to the cap and socket. 2. It can be crimped to a "post" (below) and used to connect canvas to canvas. The cap and socket would be on one piece of material and the stud and post would be on another piece of material
The post is really only used to attach to a stud. To create a point on a piece of canvas where you can then snap a cap and socket onto.
Snap fastener screw stud We stock this particular fastener in two lengths. 3/8" and 5/8" threads. Before fitting , simply drill a small pilot hole and then this fastener should self tap into most materials. If screwing into steel, personally I would use the stud above and tap the steel first and buy a machine threaded screw to use with the stud above.
Snap fastener windscreen clip. These fasteners also come in two sizes. 3/4" 19mm or 7/8" 22mm. They snap onto the alu frame around some speed boats and wind shields. No need for drilling, just clip on.
YKK snad fastener stud. 25mm base self adhesive. This stud is perfect for attaching to surfaces that are not exactly flat. They can also attach to curved frame work. Simply by cleaning the surface and peeling back the red backing. It will stick straight to any surface.
YKK snad fastener self adhesive stud 40mm white domed. This stud is for flat surfaces. Used a lot on caravan wheel arch covers. The great thing about snap fasteners is that they do no have any pointed edges or stick out much went the covers are off. Meaning you can stand on, lean against then with out it being painful.
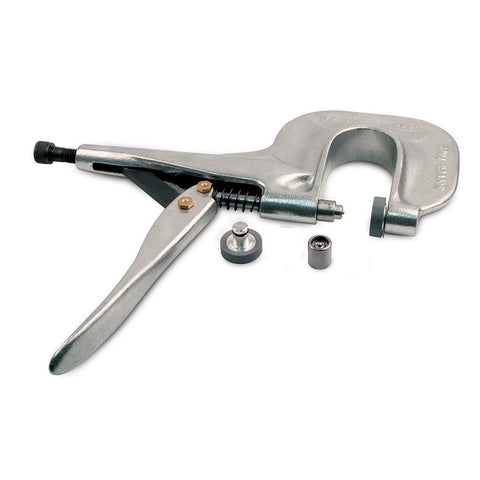
Our cheapest little tool kit. Great for fitting a few snaps. I wouldnt want to fit more than 30 or 40 with them tho. The little tool on the top cuts the holes and the tool on the bottom closes the cap against the socket and the post against the stud.
This snap fastener closing tool is an upgrade to the tools above. Just a closing tool this time. Being 3 - 4 times as long and heavy it makes a better job of closing the cap and socket.
The only tool in the world to perfectly close the socket and cap together. Simply attach the socket to the nipple of this tool and the cap into the rubber bung. No need for cutting holes, just insert you canvas between the two fasteners attached to the tool and squeeze. Jobs a good'n! This tool is expensive for the end user wanting to attach a few snaps so we also offer a hire on the tool.
All these fasteners and tools can be found in our shop.
In this blog I will talk about the various different types of snap fasteners and how to fit each one. First of all we will familiarise ourselves with the correct terminology.
So the main types of snap fasteners are the cap, the socket, the post and the stud. The stud can often come with a screw already attached like in the first picture. Like many canopy manufacturers we tend to sell and recommend the DOT brand fastener. Scovill in the US have been around for years and the most common material is brass nickel plated snaps. They are very good with marine environment. We also sell a 304 stainless range.
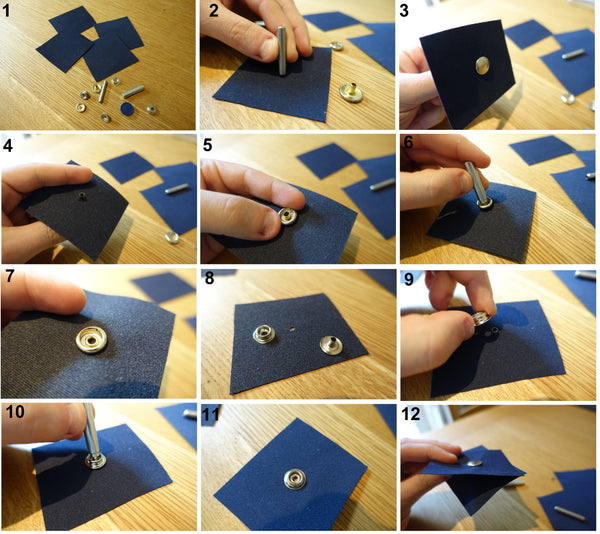
Fitting a cap and socket also a post and stud
1. Here I have four cards of canvas, our 3 piece snap fastener tool set , a cap, socket, post and stud.
2. Take the hole cutting hole and simply strike with a hammer to create a hole. Use a piece or wood under the canvas for support and a cleaner cut.
3. Insert the cap through the hole
4.Turn over the canvas
5. Place the socket onto the cap with the flat side against the canvas
6. Using the closing / setting tool strike again with a hammer several times until the post is crimped against the inside of the socket
7. Cap should be fully crimped for a nice tight fit
***** The cap and socket are now ready to attach to a stud *****
To attach canvas to canvas then you will need a post and a stud (without screw)
8. Again cut a hole in the canvas and insert the post through the hole
9. Place the stud over the post
10. Strike the closing / setting tool with a hammer until the post is crimped tight
11. The post and stud are now ready
12. You can attach the cap and socket from 1-7 with the post and stud 8-12.
If you require 3 pieces of canvas to join then you can use a gypsy stud.
Using a similar technique as before we are using a gypsy stud and a socket this time. Once fitted, this part of canvas will attach between the cap and socket and the post and stud. Or you can use the gypsy stud to attached two pieces of canvas to one screw stud.
We also sell studs that require no holes to be drilled. They are our YKK snad fastener range.
They come in 2 types. 40mm white domed stud for flat surfaces or the 25mm clear flexi stud for curved surfaces.
YKK self adhesive snad fasteners are very popular on caravans in particular the wheel covers. They can be attached around the wheel cover without drilling and have no pointy edges that would catch or snag. Complete with a couple of snap fasteners they would make light work of holding up a wheel cover in the exact position you require.
Simply attach two snap fasteners (cap and socket) in each corner of you wheel cover then connect the snad fastener studs to the corners and peel of the self adhesive backing. Then just stick then were you require.
Here are a few more ideas for our snad fastener range.
All the fasteners mentioned above can be found in our shop.
]]>
https://www.jclarkemarine.com/blogs/news/115876037-how-to-fit-a-lift-the-dot-fastener2016-04-12T10:32:00+01:002016-04-12T11:20:29+01:00How to fit a lift the dot fastenerJohn Clarke
If you have read the different types of lift the dot fasteners in part 1 you will be aware of their many functions and sizes.
Here I am going to describe how the socket and plate are fitted to a section of canvas.
I am just using a few pieces of canvas cuttings for these fitting guides. Makes it easier to see each process.
So here we have the lift the dot socket and plate. Also our lift the dot hole punch which will come in very handy. The first thing to point out is the positioning of the socket. As you can only unlock these fasteners by lifting the dot. So you want to have it sitting with the dot along the edge of the material. (I am using a small section of canvas so it wont matter)
Usually the studs will already be in place so you should pull the canvas over your stud and mark where you feel the stud should come through your canvas. This will be where you place the hole part of the cutter, but make sure you have the cutter the correct way around as the 4 prongs are not evenly spread. They have 2 closer to the DOT and the other 2 are further apart.
Now place a soft piece of wood under the canvas and strike the tool with a hammer. You may have to hit several times under you get this four slits and a nice cut hole in your canvas. So in this instance the fasteners dot part will be at the bottom (I spun the tool 90 degrees from the picture above)
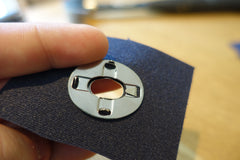
Now you can insert the socket through the holes made by the hole punch and then place the washer over these four prongs
Using the tool or the claw of the hammer you can now start to bend the four prongs down against the washer. Press them as far as they will go making it a nice tight fit.
It should now look like this. All four prongs press down against the washer
The lift the dot socket is now ready to be fixed to any of the lift the dot studs.
If you are wanting to attach canvas to canvas by using lift the dot fasteners then you need to also purchase the clinch stud and washer.
I will explain the fitting techique without the use off fancy tools.
Simply press the fastener down against the canvas
You should have created to indents in your canvas and with a leather knife of sharp blade just cut open these two indents 2mm - 4mm wide.
Insert the two prongs through the canvas and into the backing plate as shown
Then press the two prongs down against the plate so they are as flat as you can manage
The two fasteners are now ready to be fixed to one another.
Just remember the socket and plate can only be unlocked from one side where as the clinch stud can be fixed anyway round.
So there you have it. All the studs are usually fitted be drilling a pilot hole and screwing them in.
]]>
https://www.jclarkemarine.com/blogs/news/115640069-what-are-lift-the-dot-fasteners2016-04-08T11:01:00+01:002017-10-26T21:20:35+01:00What are Lift the Dot fasteners and how to fitJohn ClarkeLift the Dot
Intro
Lift the dot fasteners were first invented to hold curtains back on horse drawn carriages. They then moved into the military industry used for keeping satchels bags closed and also gun holsters shut. Due to their strength and durability they elevated onto the marine and automotive market. Lift the dots are unique as they are locked on three sides and can only be opened by "lifting the dot" on one side. This is always marked with a dot on the socket. The prongs on the socket come in two lengths to accommodate different thickness of material. There are many types of studs also, again to entertain the thickness of material or the material they are being fixed too. Lift the dot fasteners are now used on a wide range of things including classic car hoods, military satchels, marine covers, boat canopies, vintage pram covers, narrowboat cratch cover, pram hoods and we even had a cattery purchase quite a few to be used for attaching cat hammocks to scratching posts.
Specification
Made from heavy gauge brass,Nickel plated, Phosphor bronze spring used in the socket, Simple snap on - pull off action, fastener locks on three sides and will only detach from the third trademarked side
Types of lift the dot fasteners
The lift the dot socket and plate. The two parts that attach to your canopy. Make sure to fit the socket the correct way up as you can only pull the fastener off from the marked DOT end. I tend to only sell the genuine DOT brand lift the dots. They have been around for years and used by 99% of canopy designers today.
If your canvas / awning is slightly thicker than normal you can opted for the lift the dot socket and plate with longer prongs. This allows for multiple layers of canvas.
The prongs push through the canvas and into the plate on the other side where the prongs are then folded against the plate to hold in place.
The lift the dot 2 prong stud and clinch plate are used when you want to attach a piece of canvas to another piece of canvas. No hole is needed to be cut either , just two slits in the material so the two prongs can be inserted through the canvas and into the washer on the other side. A very useful little fastener type.
I have quite a few types of studs with self taping threads, threaded studs and nuts and machine threaded studs. The self taping short and long thread studs would be the most common. Although they are called self tap, you still need to drill a pilot hole and if fitting to gel coat I would advise on countersinking the hole because the gel coat could crack when tightening the stud. So why chose the short or long then?? Its simple, some boats and classic cars have thin walls, so if you dont want a sharp point coming through the inside then use the short thread. They are both rigid and the short thread has enough thread to make it a good firm base.
Next we have the 2 hole base studs. It's really down to personal preference if you prefer to use this stud or the self taping. Sometimes these ones are more easily removed or you can also fit whatever screw, nut or bolt you prefer through the holes.
The lift the dot 2 hole base fastener comes in different sizes. The most common is the one above but if you maybe need to fit a thicker canvas over the stud by using the long prong socket or need to fit more than 1 socket and plate to the stud then this is the one to go for. It also has a thicker base as it usually would end up taking more strain.
Another way to have two sockets on the one stud is to use the machine threaded self taping stud. again it will require a pilot hole drilled. This stud is very robust and the thread is slightly thicker than the two self tap above. All my lift the dots are compatible with each other.
The last studs to introduce you to are the threaded studs and nuts. These are great if you have access to the other side of the boat wall/deck or for car body work and materials that may not hold a self tap stud. Simply drill out a hole and fasten these studs and nuts.
If you require a longer threaded we also have the correct stud for you. We stock M5 x 10mm and M5 x 15mm.
If you require two sockets to be attached to the one point we also have the double height lift the dot stud with M5 thread and nut.
Lastly the 2BA machine threaded lift the dot stud.
Used a lot on classic cars and vintage boats as the majority have now turned to the M5 thread.
But just before you go, here we have the lift the dot hole punch tool. With the aid of a hammer and using a striking action you can pre cut the hole and four slits needed in your fabric to make fitting the socket a much easier job.
All the lift the dot fasteners above can be found in our shop which can be accessed by the links across the top of the page.
If you have read the different types of lift the dot fasteners in part 1 you will be aware of their many functions and sizes.
Here I am going to describe how the socket and plate are fitted to a section of canvas.
I am just using a few pieces of canvas cuttings for these fitting guides. Makes it easier to see each process.
So here we have the lift the dot socket and plate. Also our lift the dot hole punch which will come in very handy. The first thing to point out is the positioning of the socket. As you can only unlock these fasteners by lifting the dot. So you want to have it sitting with the dot along the edge of the material. (I am using a small section of canvas so it wont matter)
Usually the studs will already be in place so you should pull the canvas over your stud and mark where you feel the stud should come through your canvas. This will be where you place the hole part of the cutter, but make sure you have the cutter the correct way around as the 4 prongs are not evenly spread. They have 2 closer to the DOT and the other 2 are further apart.
Now place a soft piece of wood under the canvas and strike the tool with a hammer. You may have to hit several times under you get this four slits and a nice cut hole in your canvas. So in this instance the fasteners dot part will be at the bottom (I spun the tool 90 degrees from the picture above)
Now you can insert the socket through the holes made by the hole punch and then place the washer over these four prongs
Using the tool or the claw of the hammer you can now start to bend the four prongs down against the washer. Press them as far as they will go making it a nice tight fit.
It should now look like this. All four prongs press down against the washer
The lift the dot socket is now ready to be fixed to any of the lift the dot studs.
If you are wanting to attach canvas to canvas by using lift the dot fasteners then you need to also purchase the clinch stud and washer.
I will explain the fitting techique without the use off fancy tools.
Simply press the fastener down against the canvas
You should have created to indents in your canvas and with a leather knife of sharp blade just cut open these two indents 2mm - 4mm wide.
Insert the two prongs through the canvas and into the backing plate as shown
Then press the two prongs down against the plate so they are as flat as you can manage
The two fasteners are now ready to be fixed to one another.
Just remember the socket and plate can only be unlocked from one side where as the clinch stud can be fixed anyway round.
So there you have it. All the studs are usually fitted be drilling a pilot hole and screwing them in.
]]>
https://www.jclarkemarine.com/blogs/news/115275781-how-to-fit-snap-fasteners2016-04-05T13:54:00+01:002016-04-05T15:20:41+01:00How to fit snap fastenersJohn Clarke
In this blog I will talk about the various different types of snap fasteners and how to fit each one. First of all we will familiarise ourselves with the correct terminology.
So the main types of snap fasteners are the cap, the socket, the post and the stud. The stud can often come with a screw already attached like in the first picture. Like many canopy manufacturers we tend to sell and recommend the DOT brand fastener. Scovill in the US have been around for years and the most common material is brass nickel plated snaps. They are very good with marine environment. We also sell a 304 stainless range.
Fitting a cap and socket also a post and stud
1. Here I have four cards of canvas, our 3 piece snap fastener tool set , a cap, socket, post and stud.
2. Take the hole cutting hole and simply strike with a hammer to create a hole. Use a piece or wood under the canvas for support and a cleaner cut.
3. Insert the cap through the hole
4.Turn over the canvas
5. Place the socket onto the cap with the flat side against the canvas
6. Using the closing / setting tool strike again with a hammer several times until the post is crimped against the inside of the socket
7. Cap should be fully crimped for a nice tight fit
***** The cap and socket are now ready to attach to a stud *****
To attach canvas to canvas then you will need a post and a stud (without screw)
8. Again cut a hole in the canvas and insert the post through the hole
9. Place the stud over the post
10. Strike the closing / setting tool with a hammer until the post is crimped tight
11. The post and stud are now ready
12. You can attach the cap and socket from 1-7 with the post and stud 8-12.
If you require 3 pieces of canvas to join then you can use a gypsy stud.
Using a similar technique as before we are using a gypsy stud and a socket this time. Once fitted, this part of canvas will attach between the cap and socket and the post and stud. Or you can use the gypsy stud to attached two pieces of canvas to one screw stud.
We also sell studs that require no holes to be drilled. They are our YKK snad fastener range.
They come in 2 types. 40mm white domed stud for flat surfaces or the 25mm clear flexi stud for curved surfaces.
YKK self adhesive snad fasteners are very popular on caravans in particular the wheel covers. They can be attached around the wheel cover without drilling and have no pointy edges that would catch or snag. Complete with a couple of snap fasteners they would make light work of holding up a wheel cover in the exact position you require.
Simply attach two snap fasteners (cap and socket) in each corner of you wheel cover then connect the snad fastener studs to the corners and peel of the self adhesive backing. Then just stick then were you require.
Here are a few more ideas for our snad fastener range.
All the fasteners mentioned above can be found in our shop.
]]>
https://www.jclarkemarine.com/blogs/news/53229381-stainless-steel-304-vs-316-a2-vs-a42015-09-18T16:42:00+01:002015-09-21T09:40:30+01:00Stainless steel 304 vs 316 / A2 vs A4John Clarke
What is the difference between 304 stainless steel and 316 stainless steel or in other words what is the difference between A2 and A4 stainless steel.
So let me begin.
Where does steel come from?
Steel comes from Iron ore found in the ground. Iron ore is a mix of iron and oxygen molecules. The iron ore is melted down through a process called smelting to remove the oxygen and turn it into Metallic Iron.
Raw Iron Ore
What do we do with the iron ore?
Although the basic ingredients of an iron ore blast furnace has changed little over the last hundred years or so, the furnaces themselves have been modernized to improve efficiency and the purity of the iron and steel.
The blast furnace has an improved and more efficient shape to suit automation, with the contents of iron ore, limestone and coke being carefully measured, conveyed and loaded into the furnace from the top through specially designed gas-tight valves. High temperature air at over 1000C (which is can be heated using the exhaust gasses from the furnace much like a boiler economiser) is blasted into the bottom of the furnace through several tuyeres.
The coke is used as a fuel to produce the high temperatures required by the process of smelting the ore in a blast furnace. It produces CO which adds heat, as well as acting as a reducer removing the oxygen content from the ore.
Limestone is used as a flux to separate the gangue from the molten iron ore, the accumulated slag and the molten iron being tapped from two tap-holes at the bottom of the furnace. The slag goes to a disposal area and the molten iron is directed into molds known as pigs where it solidifies to pig iron and is transferred to the next stage of processing.
Turning the Iron Ore into steel
The basic raw material for steel manufacture is either the hot metal from the blast furnace, steel scrap or a mixture of both. The proportions of material used vary according to the process and the type of steel required. Steel can be described in general terms as iron with most of the carbon removed, to make it tougher. There are many forms (grades) of steel, each with its own specific chemical composition and properties to meet the needs of the many different applications. Two major steel making processes are used today in the UK.
Basic oxygen steelmaking and Electric Arc Furnace
Basic oxygen steelmaking
Using the hot metal from the furnace above and scrap steel are the principal materials in BOS. A water-cooled oxygen lance is lowered into the converter and high-purity oxygen is blown on to the metal at very high pressure.
The oxygen combines with carbon and other unwanted elements, eliminating them from the molten charge. These oxidation reactions produce heat, and the temperature of the metal is controlled by the quantity of added scrap.Modern furnaces, or ‘converters’ will take a charge of up to 350 tonnes and convert it into steel in around 15 minutes.
The carbon exits the converter as a gas, carbon monoxide, which can, after cleaning, be collected for re-use as a fuel. During the ‘blow’, lime is added as a flux to help carry off the other oxidized impurities as a floating layer of slag . The quantities of scrap, hot metal and lime and other fluxes are calculated to ensure the correct steel temperature and composition. In many plants, the refining process is assisted by the injection of gases, including argon, nitrogen and carbon dioxide, through the base of the furnace. After the steel has been refined and samples taken to check temperature and composition, the converter is tilted and the steel is tapped into a ladle. Typically, the carbon content of the steel at the end of refining is about 0.04%. During tapping, alloy additions can be made to adjust the final composition of the steel.
When all the steel has been tapped, the converter is turned upside down and the residual slag is tipped into a waiting slag ladle for removal to a slag cooling pond, from where it is further processed to reclaim any material which can be returned to the process.
Electric Arc Furnace
The EAF mostly uses cold scrap metal only. This process was first used for making the best steel available to be used for tools and springs as there is more control over the composition. Today, however, it is also employed in making more widely used steels, including alloy and stainless grades as well as some special carbon and low-alloy steels.
With what looks like a round bath with a removable roof, through which three graphite electrodes can be raised or lowered. At the start of the process, the electrodes are withdrawn and the roof swung clear. The steel scrap is then charged into the furnace from a large steel basket lowered from an overhead travelling crane. When charging is complete, the roof is swung back into position and the electrodes lowered into the furnace. A powerful electric current is passed through the charge, an arc is created, and the heat generated melts the scrap. Lime and fluorspar are added as fluxes and oxygen is blown into the melt. As a result, impurities in the metal combine to form a liquid slag
Samples of the steel are taken and analysed to their check composition and, when the correct composition and temperature have been achieved, the furnace is tapped rapidly into a ladle. Final adjustments to precise customer specification can be made by adding alloys during tapping.
How is stainless steel is made?
Stainless steel is made up from some of the basic elements found in the earth: iron ore, chromium, silicon, nickel, carbon, nitrogen and manganese. Varying the amounts of these substances creates the different grades of stainless steel.
Stainless steel can be made up from scrap steel.
Stainless steel is produced in an electric arc furnace where carbon electrodes contact recycled stainless scrap and various alloys of chromium (and nickel, molybdenum etc. depending on the stainless type). A current is passed through the electrode and the temperature increases to a point where the scrap and alloys melt. The molten material from the electric furnace is then transferred into an AOD (Argon Oxygen Decarbonization) vessel, where the carbon levels are reduced (remember stainless has a much lower carbon level than mild steel) and the final alloy additions are made to make the exact chemistry. The mix is then melted and casted either into ingots or continually cast into a slab or billet form. Then the material is hot rolled or forged into its final form. Some material receives cold rolling to further reduce the thickness as in sheets or drawn into smaller diameters as in rods and wire.
Most stainless steels receive a final annealing (a heat treatment that softens the structure) and pickling (an acid wash that removes furnace scale from annealing and helps promote the passive surface film that naturally occurs).
The fact that stainless steel has a great resistance to corrosion means that using stainless will result in a very long life compared to mild steel. Structures made from stainless steel will last many times the normal life (well over 100 years in most cases). So, while stainless steel is probably more expensive to buy in the beginning -- because it lasts a long time, it is usually cheaper in the long run because there is little or no maintenance and repair costs. AND, once the useful life is over, stainless steel is 100% RECYCLABLE. Scrap stainless steel is recharged into the electric furnaces for re-melting back into stainless steel. Stainless steel is a true "full life cycle" material.
So what are the differences between the main types of stainless steel.
What is the difference between 304 and 316 stainless steel?
There are many grades of stainless steel but in this blog we shall look at the two main types. Each of these types of stainless have their pros and cons, both are manufactured to meet differing environmental and physical demands. So let take a look at the main points of 304 stainless steel and 316 stainless steel.
1. Composition of SS This is the first main difference between 304 grade stainless steel and 316 grade stainless steel. Chromium and alloy content and crystalline structure determines the steel classification. Austenitic steel – also known as 300 series steel – contains 18% chromium and 8% nickel. This type of steel is incredibly common; about 70% of stainless steel products are composed of austenitic steel. 304 grade stainless steel is considered to be austenitic, while 316 grade stainless steel is considered to be superaustenitic – meaning it contains a higher content of molybdenum, nitrogen and nickel, making it more resistant to corrosion and stress.
2. Resistance to Corrosion 304 stainless steel also known as A2 stainless steel is resistant to corrosion however 316 stainless steel also known as A4 stainless steel provides a higher degree of corrosion resistance because it contains molybdenum in its composition. Therefore making 316 A4 stainless steel a better suited steel for resistance to extreme environmental conditions like exposure to chemical solutions, brine solutions, de-icing salts and of course salt water. 304 stainless steel or A2 as some like to call it will tarnish after a while but will resist corrosion for a time
3. Applications Stainless steel type 304 is used frequently in a variety of contexts. It is often found in household products and appliances, including pots and pans, coffee urns, stoves, refrigerators and sinks. It is also commonly used in dairy equipment and the brewing and food producing industries. 304 grade stainless steel is also used frequently for nuts, bolts, screws and other fasteners.
Stainless steel type 316 is more commonly used in severe environments and for industrial processes that require higher levels of resistance to corrosion than 304 grade stainless steel can offer. This type of metal is often used in chemical processing equipment, to create fasteners and hardware used for industrial purposes, and in surgical implants. It is also frequently used in marine environments because of its higher resistance to tarnish and corrosion. It is also widely used in marine environments were its resistance to salt water is crucial. All fittings at J Clarke Marine are A4 316 stainless steel unless other wise stated. We try to source the best products available on the market that will last for as long as possible.
4. Cost Typically, 316 grade stainless steel costs slightly more than 304 grade steel because of its enhanced chemical and production properties. The extra cost can be justified, however, because hardware made of type 316 stainless steel is extra resistant to tarnish and corrosion, enabling it to last a very long time.
5. What chemicals are used in Stainless steel?
Chemicals
Type 304
Type 316
Carbon
0.08% max
0.08% max
Manganese
2.00 % max
2.00% max
Phosphorus
0.045% max
0.045% max
Sulfur
0.030% max
0.030% max
Silicon
1.00% max
1.00% max
Chromium
18.00-20.00%
16.00-18.00
Nickel
8.00-10.50%
10.00-14.00
Molybdenum
2.00-3.00%
6. Is stainless steel magnetic??
It is often asked whether 316 A4 stainless steel or 304 A2 stainless steel is magnetic. Lets take a look
................to be continued
]]>
https://www.jclarkemarine.com/blogs/news/17505296-a-guide-to-canopy-fasteners2015-02-27T12:08:00+00:002021-09-13T08:50:22+01:00A guide to canopy fastenersJohn Clarke
"Do you sell those twisty turnbuckle fasteners?" is a question quite frequently asked. I have to admit , I do sell turnbutton fasteners and if you want to call them turnbuckle fasteners , I do sell those also and many other types of fasteners which then opens a can of worms for the buyer. We will leave turnbuckles in the rigging sector for now.
There are many types of canopy fasteners and not only are they used on boat canopies but also classic/vintage car hoods, vintage coach pram hoods, military satchels, narrowboats and marquees to name a few but in this blog I am going to chat about the most commonly used fasteners in the market today. This includes Lift the Dot , Turnbutton, Tomax and Snap fasteners. In the picture below you will see a few pieces from each range. Through the guide you will hear me using terminology such as socket/eyelet and stud. Socket will refer to the female part of the fastener or the part you see on the top of your canopy and stud is generally the part you fix to the deck or floor. Studs can be threaded, self taper or simply have holes positioned on them so you can fix with screws, rivets or bolts.
There are pros and cons to each of the fasteners above and I will try to describe the function, fitting and durability as best I can.
Lift the DOT
Lift the Dot
Intro
Lift the dot fasteners were first invented to hold curtains back on horse driving carriages. They then moved into the military industry used for keeping satchels bags close and also gun holsters shut. Due to their strength and durability they elevated onto the marine and automotive market. Lift the dots are unique as they are locked on three sides and can only be opened by "lifting the dot" on one side. This is always marked with a dot on the socket. The prongs on the socket come in two lengths to accommodate different thickness of material. There are many types of studs also, again to entertain the thickness of material or the material they are being fixed too.
Specification
Made from heavy gauge brass,Nickel plated, Phosphor bronze spring used in the socket, Simple snap on - pull off action, fastener locks on three sides and will only detach from the third trademarked side
Advantages
Very simple to use, strong and durable, very effective against wind due to the lock on three sides, low profile so the socket does not stick out too much. Fitting tool not essential
Disadvantages
Cutting a hole in the material to fit your socket is the hardest part. There are tools on the market and can cost anything from £50 for an anvil hammer type up to £600 for a professional plier shape hole cutter. I understand for those who are repairing their own canopy to save money, the cost of these tools are usually out of the question especially if you are only wanting to repair a few lift the dots. We offer a little tool just under £20 which works well. Beware: The prongs on the lift the dot socket are not identical to the prongs on the turnbutton. Lift the dot has a smaller round hole with 2 prongs at one end further apart then the other 2 prongs on the opposite end. The turnbutton has an oval hole with the prongs at 12, 3, 6 and 9 O'clock or North, South, East and West.
Fitting
I am only giving advice to the fitting of the actual fastener and not how to fit your canopy as not every canopy is the same and requires different starting procedures.
Pull your canopy over the stud making it nice and taught then mark the material with chalk. Once you have marked where you want your socket to go it is now time to fit the socket and backing plate. You can do this by either using one of the tools mentioned above or a good old home technique. Just remember the lift the dot socket can only be fitted one way around. You usually want the DOT on the outside / edge of your material so it is easy take it off and on once fitted. The special lift the dot tool should also cut four slots for you making it easier to slot the socket into the canvas. If your canvas is not too thick , you can force the socket through the canvas as the socket prongs are sharp enough to pierce canvas on their own. If this is not an option then you can carefully use the socket to indent the material and then use a leather knife to cut the prong holes. Once the four prongs are through the canvas then you can mark where you need the hole to be cut (if your taking the socket back off) or slot them through the lift the dot backing plate on the other side of your canvas, bend the prongs down against the plate and this will hold the fitting in place. You can now mark where you want the hole to be cut by turning the canopy over so you are looking at the backing plate and using a sharp knife you can use the backing plate as a guide to cut out a hole. Avoid fraying the material.
Turnbutton
Turnbutton
Intro
Also known as Common Sense outside Europe, again another fastener that was first invented to hold curtains back on horse driving carriages, but once the first group of automobiles came along the turnbutton was used in open air cars to secure curtains. Turnbuttons are probably the most common fasteners used on boat canopies as they can not be opened by accident. They require force to twist the button on the stud which allows the release of the socket. The prongs on the socket come in two lengths to accommodate different thickness of material. There are many types of studs also, again to entertain the thickness of material or the material they are being fixed too.
Specification
Made from heavy gauge brass, Nickel plated, Steel srping used in body, Simple twist to lock action, Fastener is locked by twisting the knob, different heights available.
The base has two common heights. The measurement is taken from the distance between the base and the twist knob. Here is why they are often called 6mm base (standard height) and 8mm base (double height)
Advantages
Very simple to use, strong and durable, very effective against wind due to twist lock action, low profile so the socket does not stick out too much. Fitting tool not essential
Disadvantages
Again cutting a hole in the material to fit your socket is the hardest part. Like the lift the dot tools, there are turnbutton tools on the market and can cost anything from £50 for an anvil hammer type up to £400 for a professional plier shape hole cutter. I understand for those who are repairing their own canopy to save money, the cost of these tools are usually out of the question especially if you are only wanting to repair a few turnbuttons. For this reason we offer the hammer type tool for hire and for purchase. Beware: The prongs on the turnbutton socket are not in the same position as the lift the dot socket, the turnbutton has an oval hole with the prongs at 12, 3, 6 and 9 O'clock or North, South, East and West. The lift the dot socket has a smaller round hole with 2 prongs at one end further apart then the other 2 prongs on the opposite end.
Fitting
Again I am only giving advice to the fitting of the actual fastener and not how to fit your canopy as not every canopy is the same and requires different starting procedures.
Pull your canopy over the stud making it nice and taught then mark the material with chalk. Once you have marked where you want your socket to go it is now time to fit the socket and backing plate. You can do this by either using one of the tools mentioned above or a good old home technique. Make sure to fit your turnbutton socket the right way around. Match it up in line with the twist base. The turnbutton tool will cut four slots for you making it easier to slot the socket into the canvas. If your canvas is not too thick , you can force the socket through the canvas as the socket prongs are sharp enough to pierce canvas on their own. If this is not an option then you can carefully use the socket to indent the material and then use a leather knife to cut the prong holes. Once the four prongs are through the canvas then you can mark where you need the hole to be cut (if your taking the socket back off) or slot them through the lift the dot backing plate on the other side of your canvas, bend the prongs down against the plate and this will hold the fitting in place. You can now mark where you want the hole to be cut by turning the canopy over so you are looking at the backing plate and using a sharp knife you can use the backing plate as a guide to cut out a hole. Avoid fraying the material.
Snap fasteners
Snap Fasteners
Intro
Snap fasteners are used all over the world in a multitude of industries, but we are going to talk about the boating end of the market where the Durable DOT brand is a world leader. With the right tools the durable DOT snap fastener is self piercing and can penetrate through tough materials without the need of a hole pre cut. They have consistent snap action time after time.
Specification
Made from heavy gauge brass or stainless steel, phosphor bronze spring in brass product/stainless steel is all stainless, simple snap on - pull off action, heavy duty spring limits risk of unwanted detachment, huge range available. To help with terminology take a look at the picture below
Advantages
Very simple to use, strong and durable, flat on both deck and canvas, inexpensive
Disadvantages
Fitting!
Fitting
Again I am only giving advice to the fitting of the actual fastener and not how to fit your canopy as not every canopy is the same and requires different starting procedures.
Fitting snap fasteners can require patience if the correct tools are not present. They are also mostly fitted by crimping two parts together.
Cap and socket - can then be fixed to a stud on deck or.....
Post and stud - means you can attach a cap/socket on one canopy to a post/stud on another
Gypsy stud - these are used when you want to attach two pieces of material to one point. You would use from base up, a stud either on deck or on a railing, then socket and gypsy stud (socket attaches to deck stud) then cap and socket (socket attaches to gypsy stud)
To fit the cap and socket you need to insert the cap through your canvas, either use the tools provided in my kits or cut your own hole. (just enough to fit the cap's post through) Once the cap is through the canvas then insert it into the socket. Now you have to bend the cap's post in place inside the socket. To do this use the tools provided in the kits by using a hammer to hit the tool against the cap's post until it folds onto itself securing it to the socket. If skillful enough, a star screw driver or similar could fold out the cap in place.
The same is done with the stud and post.
The easiest way to fit this is with the snap n press tool. I also offer these for hire as they can be quite expensive for fitting a few snaps. These come with full fitting guide. Basically insert a cap into the top rubber holder and clip a socket onto the little metal stud, thread your material between these two and crimp. The socket and cap will be fixed in place. No hole cutting , required, no hammers.simple.
Tomax (coming soon)
Tomax
Intro
Specification
Advantages
Disadvantages
Fitting
Video coming soon...........
]]>
https://www.jclarkemarine.com/blogs/news/7596719-sailor-bags2013-03-29T20:59:05+00:002016-03-15T16:18:47+00:00Sailor BagsJohn ClarkeBelow is just a small sample of Sailor Bags reviews. Go to the links above for a more complete listing.
By Ericka Watson, About.com Guide
It's surprising the amount gear required for a day of boating: clothing, swimsuits, towels, sunscreen, sunglasses, food and drinks, books or magazines, cameras, cell phones, and more. Wouldn't it be nice to store all of that stuff in stylish, waterproof and easy-to-carry bags? Well, with SailorBags you can tote all of your boating accessories easily and with style.
A Cool Bag for Every Boating Need
When I first discovered SailorBags, I was searching for the perfect gift for Father's Day. I wanted to find an affordable boating gift that I could have custom embroidered and that would be functional. When I found SailorBags, I was impressed with the look and functionality of their product, but when they sent me four bags to review for my readers, I was completely sold.
SailorBags, made of real, custom-woven sailcloth, combine durability and functionality in attractive backpacks, totes, handbags, soft-side coolers and more. Perfect for all your boating needs, SailorBags are soft and flexible but are made to withstand the rigors of the marine environment with triple bottom layers and waterproof liners. They also make great gifts because they can be purchased and personalized with a name or initials, a boat name and hailing port, or even custom logos for individuals or business names.
They have many different bags for as many boating needs: messenger and electronics bags, lunch bags, mini-totes or duffels, regular totes and duffels, backpacks, cooler bags, stow bags, toiletries bags, purses, wine bags, pillow covers and a navigator's tool tote. If you have to tote it or store it, they have a bag for it.
Affordable Style
You might think that these bags, with their great construction and lifetime guarantee, would be expensive. Not so. SailorBags are affordable and add great value because they are made to be durable and waterproof. There are several options for under $20 including the mini-tote, toiletries kit, stow bags and the wine bag.
All Sailorbags are offered in white, but many of the bags can be ordered in the traditional nautical colors of red or blue. The bags are washable and as SailorBags states, each one "acquires its own patina and personality over time."
If you are looking for durable, attractive bags for all your boating needs, SailorBags are an affordable option.
Great looking, tough bags made from real sailcloth!
SailorBags are beautiful, hand-sewn bags made from real sailcloth. The cloth is tight-woven, soft, and flexible. The bags are nearly impervious to water and, with their triple layers on the bottom, immune to abrasion. Like a good piece of leather, SailorBags acquire their own patina and personality over time.
Each bag is lined with a tough, waterproof liner that's easy to clean. They're completely washable, too — just toss them in the washer and hang to dry. And every SailorBag is unconditionally guaranteed for life!
GOOD STUFF
By Jim Sutton,
Stuff it - nautically speaking
SailorBags manufactures an array of nautical totes and duffels - all made from special sailcloth that's durable and waterproof, the company says - and can be ordered with boat names or monograms. All sales include a money-back guarantee. The line includes stow bags, navigator tool totes, soft-sided coolers, wine bags, camera bags and more. Prices range from around $20 to $80.
]]>


 Tenax 2 hole base stud
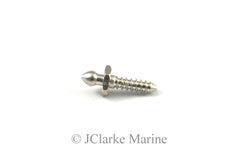 Tenax woodscrew stud
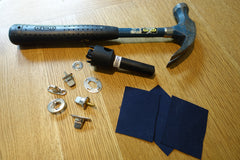 Tools, required for the job. Turnbutton hole cutter, hammer and wooden base. (preferably not your dining table)
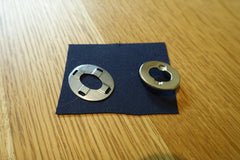 So taking our turnbutton eyelet and washer first, position your canvas over the turnbutton base and mark where you want the eyelet to be fixed.
 Then insert the turnbutton eyelet through the holes and through the plate on the other side. Bend each prong down against the washer until it is firmly fixed
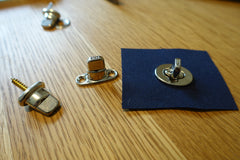 You can now fit the eyelet and washer to any of the studs. Make sure you get the turnbutton the correct way around , as you can see from this picture the base can only be locked in one position.
 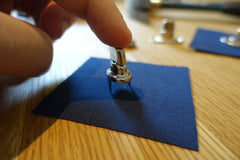 Now for the 2 prong stud. Position the stud on the canvas and hold it down firmly to make an indent on your cover.
  Then with a sharp knife, simply cut the two indents about 3-4mm wide.
  Then insert the 2 prong stud through the canvas and also through the washer on the other side. Again bend down the prongs against the washer to secure the fastener.
 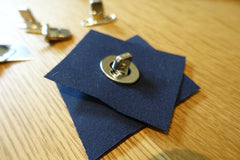 You can now fit the eyelet and washer to the 2 prong stud and washer.
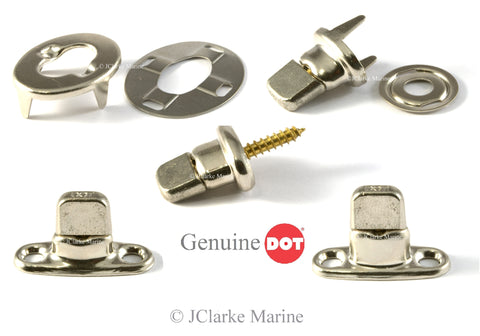
 Turnbutton fastener eyelet and plate. These parts are fastened to the canvas and can be connected to any of the other turnbuttons shown in the picture above.
 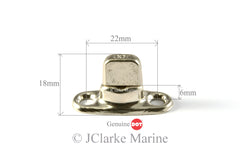 6mm Turnbutton 2 hole base.
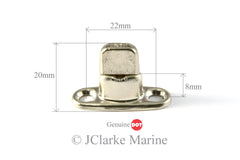 8mm Turnbutton 2 hole base So now we can see where the 6mm and 8mm relates to. If you have a thicker canvas you would use the 8mm stud.
 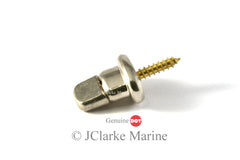 Screw in brass threaded turnbutton stud Probably the least used turnbutton of them all as the two bases above do the same job for half the price and are better secured. But if you only have room for one screw hole then this fits the bill perfectly.
 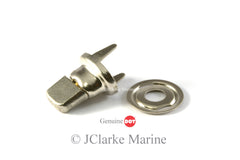 Turnbutton cloth to cloth When you are needing to attach two pieces of canvas together with turnbutton then this is the only way.
 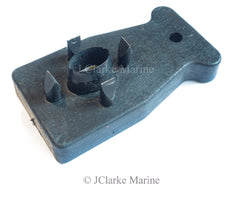 We have designed this turnbutton tool ourselves. Perfect for doing one off jobs and also very cost effective. Very very functional and helps fit the eyelets no problem
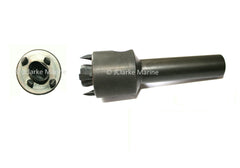 The turnbutton hole punch tool This tool will cut an oval hole and four slits for the turnbutton eyelet to be easily fitted to your canvas. Simply by striking a hammer against its end.
 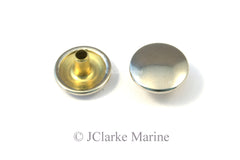 First up we have the snap fastener cap. The cap comes in various lengths. When I say lengths, I talk about the cylindrical post length that protrudes from the centre of the cap. We tend to stock a 4mm long and a 6mm long. This should cover 99% of material thickness. If you have a few layers of material then you would want to use the 6mm. Other wise use the 4mm
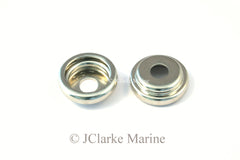 The cap would not be complete with out the socket. These two are crimped together to create a snap. The cap being on the outside of the canvas and the socket on the inside. Special tools are require to secure the cap to the socket.
 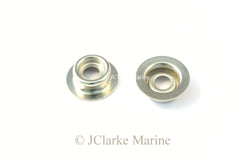 The snap fastener stud. This particular stud has two main uses. 1. It can be attached to the deck with a screw or nut and threaded screw which can be then connected straight to the cap and socket. 2. It can be crimped to a "post" (below) and used to connect canvas to canvas. The cap and socket would be on one piece of material and the stud and post would be on another piece of material
 The post is really only used to attach to a stud. To create a point on a piece of canvas where you can then snap a cap and socket onto.
  Snap fastener screw stud
 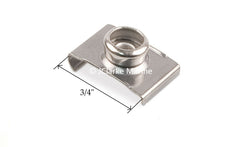 Snap fastener windscreen clip. These fasteners also come in two sizes. 3/4" 19mm or 7/8" 22mm. They snap onto the alu frame around some speed boats and wind shields. No need for drilling, just clip on.
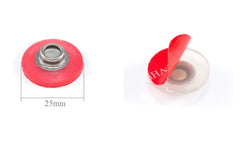 YKK snad fastener stud. 25mm base self adhesive. This stud is perfect for attaching to surfaces that are not exactly flat. They can also attach to curved frame work. Simply by cleaning the surface and peeling back the red backing. It will stick straight to any surface.
 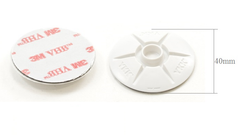 YKK snad fastener self adhesive stud 40mm white domed. This stud is for flat surfaces. Used a lot on caravan wheel arch covers. The great thing about snap fasteners is that they do no have any pointed edges or stick out much went the covers are off. Meaning you can stand on, lean against then with out it being painful.
 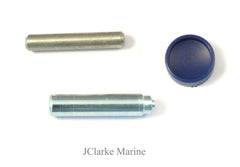 Our cheapest little tool kit. Great for fitting a few snaps. I wouldnt want to fit more than 30 or 40 with them tho. The little tool on the top cuts the holes and the tool on the bottom closes the cap against the socket and the post against the stud.
  This snap fastener closing tool is an upgrade to the tools above. Just a closing tool this time. Being 3 - 4 times as long and heavy it makes a better job of closing the cap and socket.
  The only tool in the world to perfectly close the socket and cap together. Simply attach the socket to the nipple of this tool and the cap into the rubber bung. No need for cutting holes, just insert you canvas between the two fasteners attached to the tool and squeeze. Jobs a good'n!
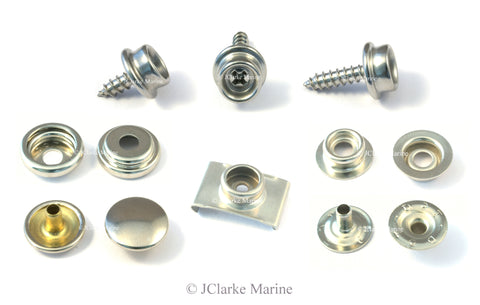


 I am just using a few pieces of canvas cuttings for these fitting guides. Makes it easier to see each process.
  So here we have the lift the dot socket and plate. Also our lift the dot hole punch which will come in very handy.
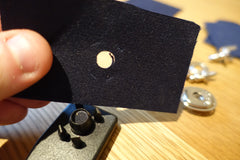 Usually the studs will already be in place so you should pull the canvas over your stud and mark where you feel the stud should come through your canvas. This will be where you place the hole part of the cutter, but make sure you have the cutter the correct way around as the 4 prongs are not evenly spread. They have 2 closer to the DOT and the other 2 are further apart.
 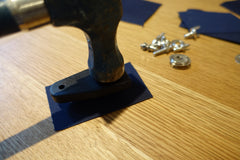 Now place a soft piece of wood under the canvas and strike the tool with a hammer. You may have to hit several times under you get this four slits and a nice cut hole in your canvas.
 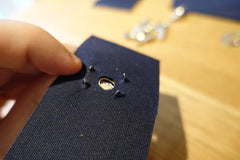 Now you can insert the socket through the holes made by the hole punch and then place the washer over these four prongs
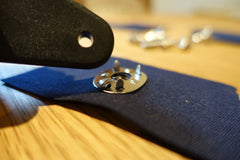 Using the tool or the claw of the hammer you can now start to bend the four prongs down against the washer. Press them as far as they will go making it a nice tight fit.
  It should now look like this. All four prongs press down against the washer
 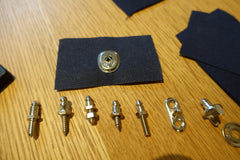 The lift the dot socket is now ready to be fixed to any of the lift the dot studs.
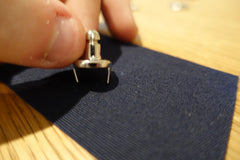 If you are wanting to attach canvas to canvas by using lift the dot fasteners then you need to also purchase the clinch stud and washer.
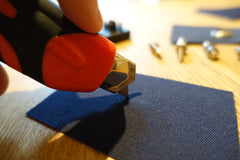 You should have created to indents in your canvas and with a leather knife of sharp blade just cut open these two indents 2mm - 4mm wide.
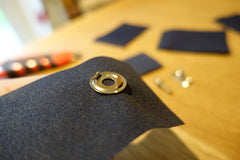 Insert the two prongs through the canvas and into the backing plate as shown
  Then press the two prongs down against the plate so they are as flat as you can manage
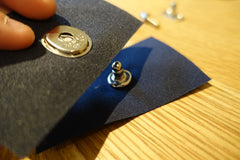 The two fasteners are now ready to be fixed to one another.
 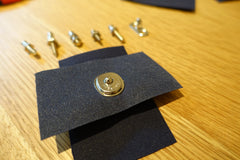 So there you have it. All the studs are usually fitted be drilling a pilot hole and screwing them in.
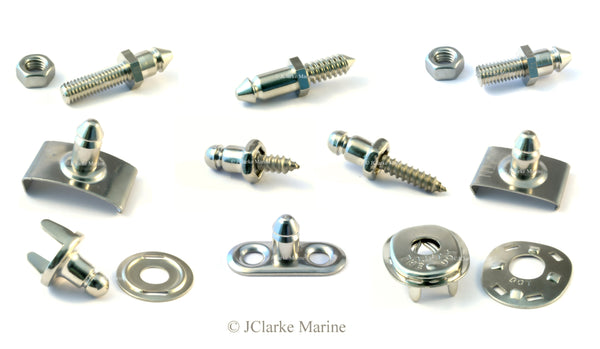
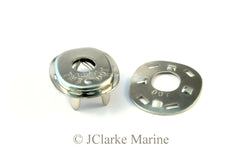 The lift the dot socket and plate. The two parts that attach to your canopy. Make sure to fit the socket the correct way up as you can only pull the fastener off from the marked DOT end. I tend to only sell the genuine DOT brand lift the dots. They have been around for years and used by 99% of canopy designers today.
 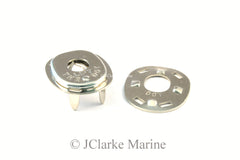 If your canvas / awning is slightly thicker than normal you can opted for the lift the dot socket and plate with longer prongs. This allows for multiple layers of canvas.
 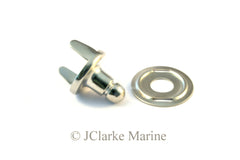 The lift the dot 2 prong stud and clinch plate are used when you want to attach a piece of canvas to another piece of canvas. No hole is needed to be cut either , just two slits in the material so the two prongs can be inserted through the canvas and into the washer on the other side. A very useful little fastener type.
 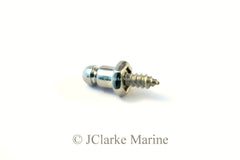 I have quite a few types of studs with self taping threads, threaded studs and nuts and machine threaded studs. The self taping short and long thread studs would be the most common. Although they are called self tap, you still need to drill a pilot hole and if fitting to gel coat I would advise on countersinking the hole because the gel coat could crack when tightening the stud.
 So why chose the short or long then?? Its simple, some boats and classic cars have thin walls, so if you dont want a sharp point coming through the inside then use the short thread. They are both rigid and the short thread has enough thread to make it a good firm base.
  Next we have the 2 hole base studs. It's really down to personal preference if you prefer to use this stud or the self taping. Sometimes these ones are more easily removed or you can also fit whatever screw, nut or bolt you prefer through the holes.
 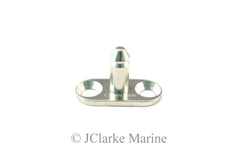 The lift the dot 2 hole base fastener comes in different sizes. The most common is the one above but if you maybe need to fit a thicker canvas over the stud by using the long prong socket or need to fit more than 1 socket and plate to the stud then this is the one to go for. It also has a thicker base as it usually would end up taking more strain.
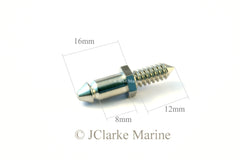 Another way to have two sockets on the one stud is to use the machine threaded self taping stud. again it will require a pilot hole drilled. This stud is very robust and the thread is slightly thicker than the two self tap above. All my lift the dots are compatible with each other.
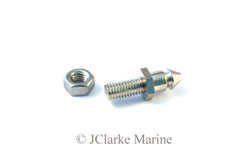 The last studs to introduce you to are the threaded studs and nuts. These are great if you have access to the other side of the boat wall/deck or for car body work and materials that may not hold a self tap stud. Simply drill out a hole and fasten these studs and nuts.
 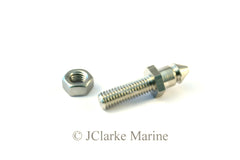 If you require a longer threaded we also have the correct stud for you. We stock M5 x 10mm and M5 x 15mm.
 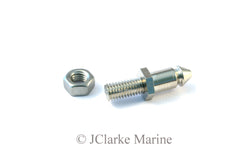 If you require two sockets to be attached to the one point we also have the double height lift the dot stud with M5 thread and nut.
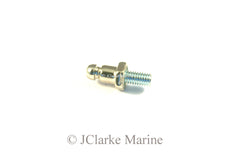


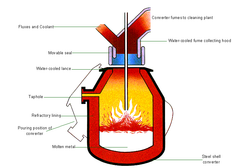
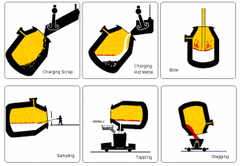 er oxidized impurities as a floating layer of slag . The quantities of scrap, hot metal and lime and other fluxes are calculated to ensure the correct steel temperature and composition. In many plants, the refining process is assisted by the injection of gases, including argon, nitrogen and carbon dioxide, through the base of the furnace. After the steel has been refined and samples taken to check temperature and composition, the converter is tilted and the steel is tapped into a ladle. Typically, the carbon content of the steel at the end of refining is about 0.04%. During tapping, alloy additions can be made to adjust the final composition of the steel.
 the furnace from a large steel basket lowered from an overhead travelling crane. When charging is complete, the roof is swung back into position and the electrodes lowered into the furnace. A powerful electric current is passed through the charge, an arc is created, and the heat generated melts the scrap. Lime and fluorspar are added as fluxes and oxygen is blown into the melt. As a result, impurities in the metal combine to form a liquid slag
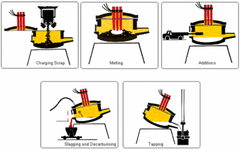 check composition and, when the correct composition and temperature have been achieved, the furnace is tapped rapidly into a ladle. Final adjustments to precise customer specification can be made by adding alloys during tapping.
 hardware used for industrial purposes, and in surgical implants. It is also frequently used in marine environments because of its higher resistance to tarnish and corrosion. It is also widely used in marine environments were its resistance to salt water is crucial. All fittings at J Clarke Marine are A4 316 stainless steel unless other wise stated. We try to source the best products available on the market that will last for as long as possible.